
Imagine that you have to make a change to a live WordPress website. It could be just a plugin update, or, more advanced change like tweaking theme layout. Basically, you are about to start changing files, settings, move things around, play with the content. But what if the website is life and you or your client don’t appreciate the idea of experimenting with a production website and potentially breaking it?
Answer is really simple – you need a staging or development environment for your website. If you are new to web development, you might wonder what’s that? Well, it’s basically a copy of your website which is hidden from public eye where you can play with files, plugins, settings and experiment without breaking live site. Most common setup for the staging copy is a subdomain. So, it your website address is www.yoursite.com, you will have test.yourwebsite.com as your staging copy. Now, to implement this idea you need to learn how to setup a staging copy of your website and then, how to push updates from the staging copy to production.
Before we start, let’s look at a couple of easy ways to copy website. First of all, some hosting providers make it easy for you. I am big fan of WPEngine and one click copy to and from staging site is one of the reasons for that. So, if your client wants a great hosting for their website, that’s a way to go. Here is a post about their staging environment.
Another simple option to clone your website is to use one of the backup/cloning plugins. There are a few available on the market, most offer free version (with some limitations). Those plugins will typically let you to download a full copy of your website which can be then used to setup a staging site. Depending on plugin there might be a need to update database once site is moved to fix website domain name and URLs in menus, settings and text links (we will look at this in this guide as well). Downside of this method is that it moves entire website, so if you have a lot of media files, moving those every time will take a while as backup size can be pretty big. Obviously you need to do it anyway for the first time setup, but when you just pushing your updates to the live site, it would be great to avoid full website transfer and move only parts you changed, would not it?
With those alternatives in mind, let’s look at setting up your staging environment manually. There will be three steps in this process:
- Copy files
- Copy database
- Update config file
Let’s start!
Copy WordPress Files
There are two possibilities – copying entire website and only moving selected changes.
Copying entire website is needed if you want to create a new staging environment, or, if you want to make a complete “reset” of your test site. In this case it is what it is – you connect to your hosting account via FTP (or sFTP) client and download all files from the public folder. That will include WordPress core files, plugins, themes and media files.
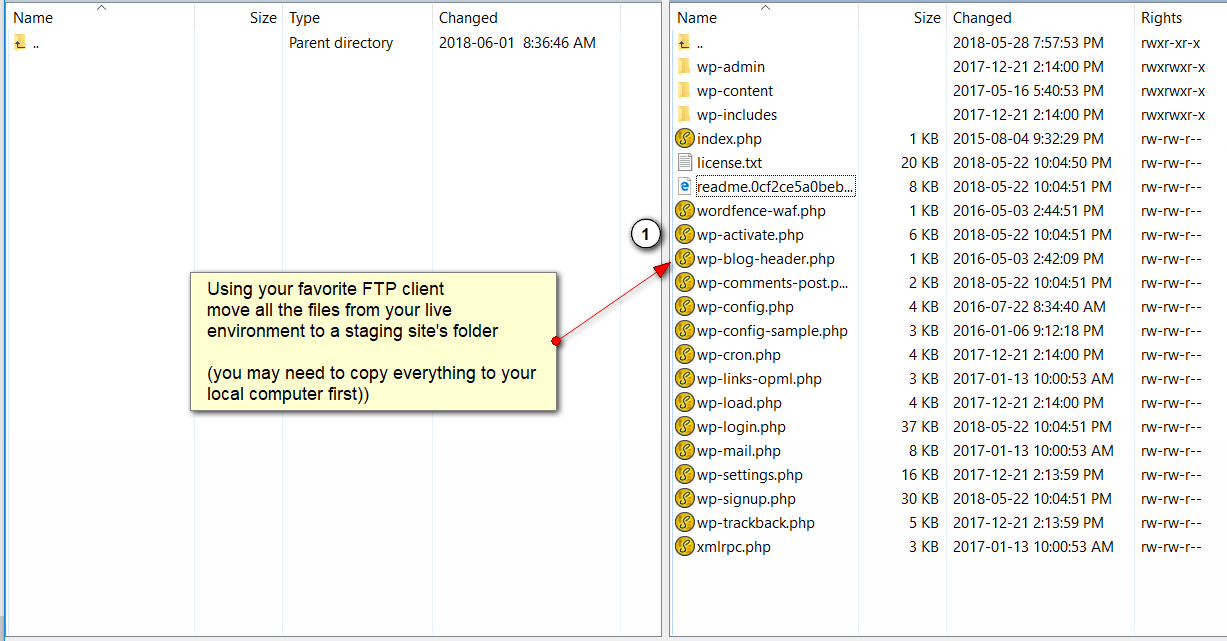
Here is a little hint: if your hosting uses CPanel (or something similar), you may have “Compress” feature available which will allow to pack all files into one zip archive before downloading. This will make total transfer size smaller and faster.
If you are moving files within the same hosting account, you can actually use CPanel’s file manager to copy files to the subdomain’s folder right from file manager without need to download those to your computer via FTP.
Copy Database
Copying database is a bit more complicated task. The big problem is that WordPress will have your website’s URL stored in the database many times as it keeps WordPress settings (main site’s URL), menu items, links within your content, theme and plugin configuration options, etc, etc. So, we need to find and replace all those occurrences of old URL and replace with new one, for example, change www.yoursite.com/xxx to test.yoursite.com/xxx. The way WordPress stores data in a serialized PHP arrays makes this task even harder. You can not just do global search and replace in your database, because this will break serialization and data will become broken.
I personally tried different methods to deal with this, such as having a set of SQL queries to update domain name in “safe” places, but that was leaving serialized data out of reach. So, my tool of choice now is free version of WP Migrate DB plugin. This plugin let’s you download a copy of your while making replacement for things like domain names and local file paths. It never failed me to create a nice working copy of database which is ready to go.
So, if we are copying database from www.yoursite.com to test.yoursite.com, login to WP admin on that site, install WP Migrate DB plugin and export database while replacing www.yoursite.com with test.yoursite.com.
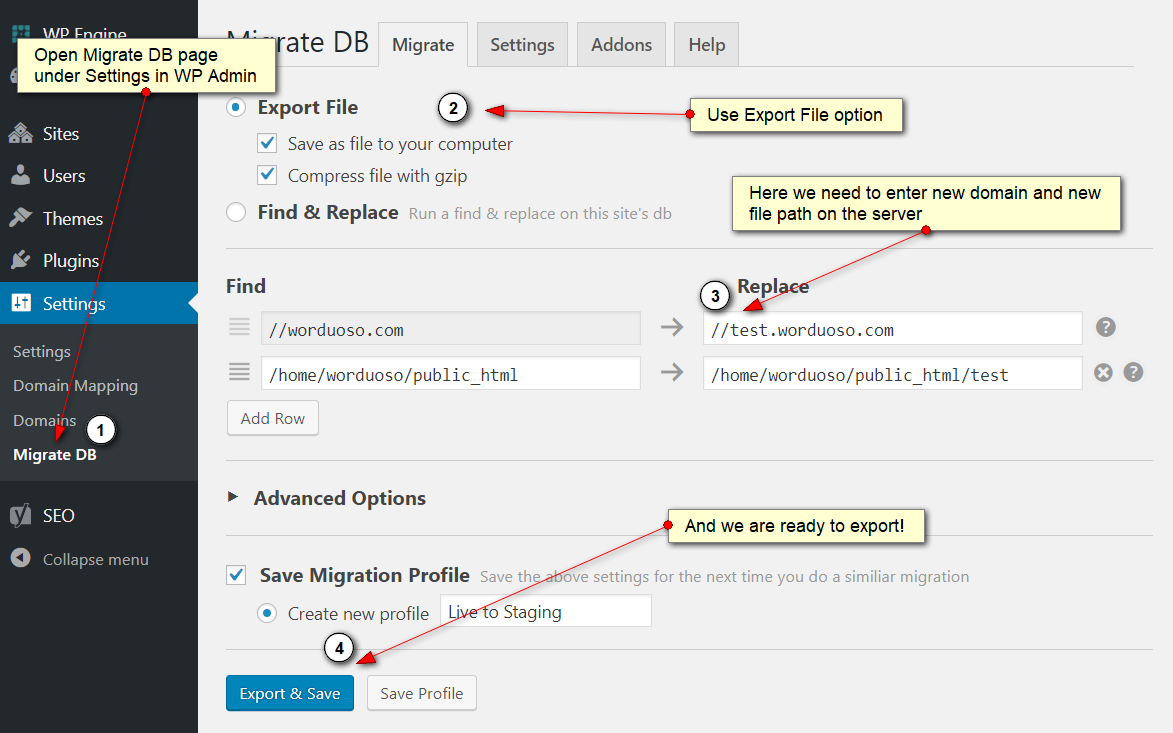
You will receive a copy of your database packed with gz (that’s most common archive type in linux) and it’s ready to be uploaded to the new database.
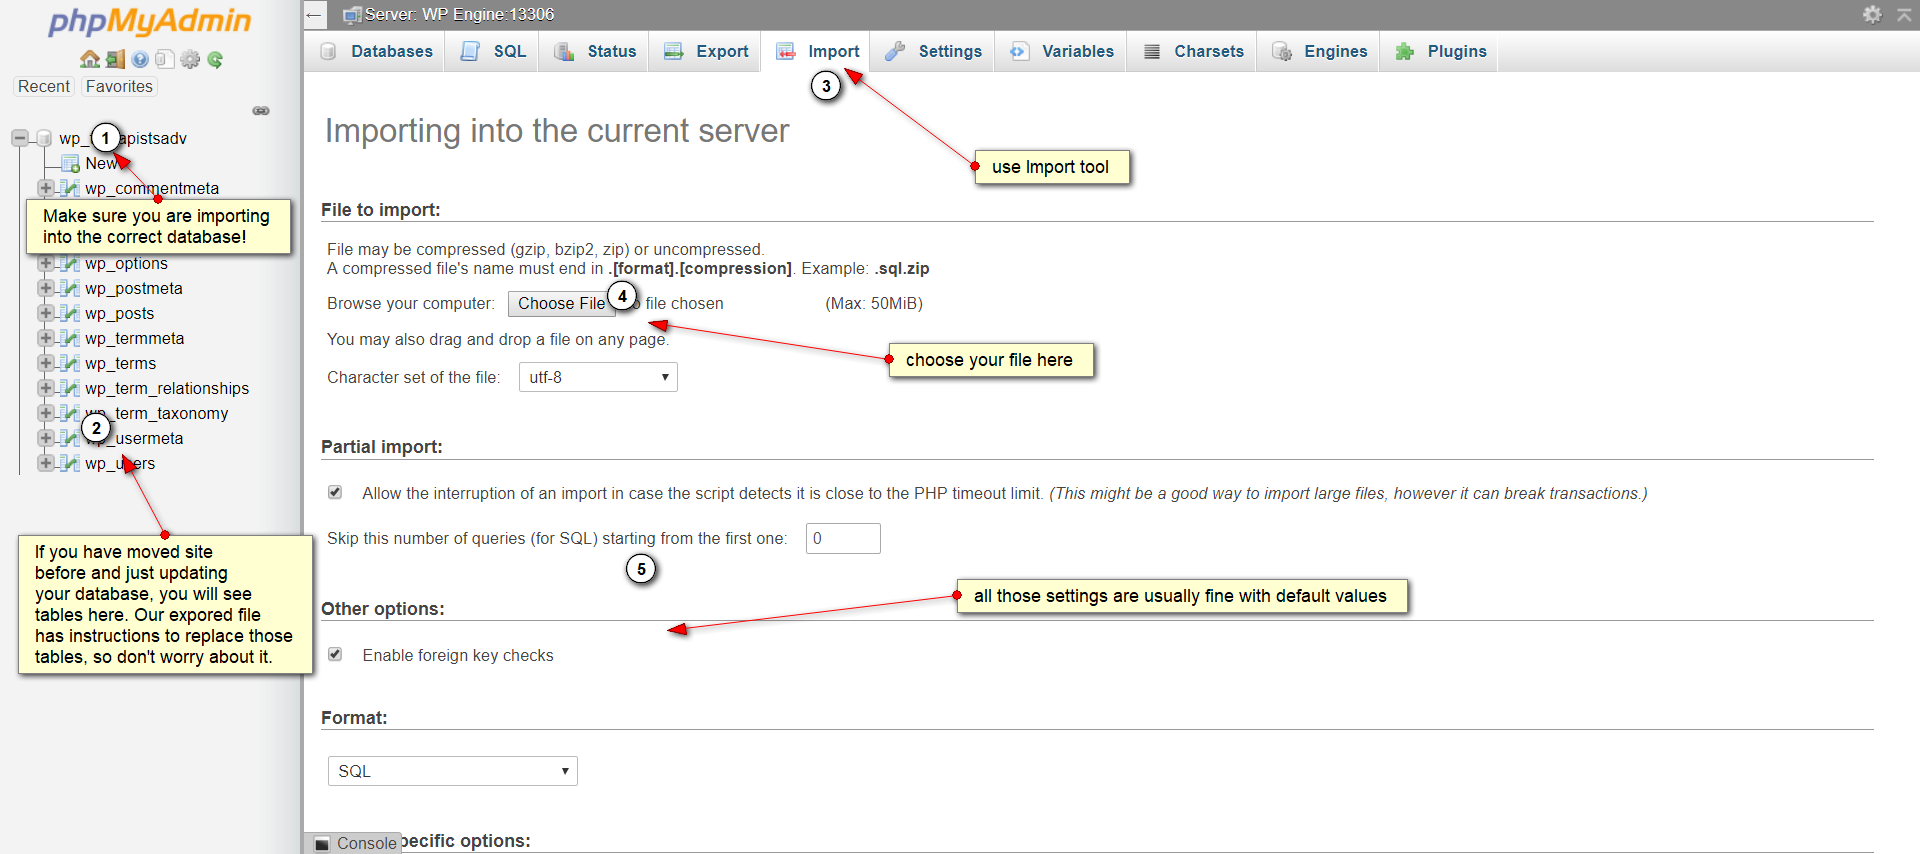
Note: if for any reason you can not / don’t want to use plugin, you can export your database using phpMyAdmin. The donwside of this method is that it will keep all URLs as is and you will need to deal with those later.
If this is the first time you setup your staging site, you will need to create a blank database first. To do that, login to your hosting provider’s CPanel (or similar control panel) and search for MySQL databases. From there, find Create New Database and come up with new database name for your staging site. Once database is created, you will also need to create a new MySQL user and assign it to the new database. Basically, we should have 3 pieces of info after that process – database name, database username and database password. Record that data as we will need it to configure new WordPress install later.
Next steps will be the same regardless if this is first time migration or you already have a website copy and just want to bring it up to date.
Open phpMyAdmin from hosting’s control panel and find the database you created for a staging site there. As a guy who done a lot of sites transfer, I ask you to check database name twice to make sure we are uploading our database export to the correct spot.
That’s it for the database! Just one step left.
Update Config File
So, we have our WordPress files moved to the new location (test.yoursite.com subdomain’s folder) and database copied, there is just one step to finalize the setup.
You need to point WordPress to the new database.
WordPress keeps database settings in the wp-config.php file in the top folder of WordPress install.
Using CPanel “Files” or FTP client with your favorite text editor (notepad will do) open wp-config.php file and find likes like this:
You know what to do, don’t you? You should see database name, user and password from the live site, now just replace those with your new database name, username and password for the staging site.
And this is really it!
Your site at test.yoursite.com will now work with the new database and is ready for you to play with.
And the best thing is – if you mess it up, just re-upload files and database to “reset” your staging site.
Moving changes back to live site
Of course, at some point we want to push back updates to the live site. That’s the whole reason behind staging site, isn’t it?
How do we do that?
It’s really similar process with an exception that we may not need to move database and that we don’t need to move all files. Let’s look at this in a bit more details.
Basic steps are about the same:
- copy files
- copy database
We don’t need to update configuration if we only moving selected few files, so no need to repeat 3rd step of the original process.
Copy Files
If you made any changes to the files, we will need to move those changes back to the live site.
Usually this means moving just a few things:
- theme folder (wp-content/themes/your-theme-name/)
- new / updated plugins (wp-content/plugins/)
- media files (wp-content/uploads/) – you will see that WordPress actually arranges uploads by year and month, so most likely you only need to copy most recent uploads, no need to move entire folder every time
If you updated WordPress to the latest version on the staging site, you may opt to moving WordPress core files as well. But to be honest, I prefer to update WordPress on the live site instead. We already tested new WordPress version on the staging site, so if that was not creating any issues, you can safely update WordPress on live. This will save you trouble of moving all those core files back and forth.
Copy Database
Copying database is exactly the same process, use WP Migrate DB to copy database from staging site to live.
There are a couple of potential issues to keep in mind.
If your live site has changed since you created a database copy (content, user’s content, new user’s registered, forms completed, products sold), you should not then overwrite database on live site with your test one, because this will lose all the changes.
Unfortunately that means you just have to redo content / settings changes on the live site.
That’s usually not an issue if you was playing with the theme files because most of your changes were made to files, not the database.
But keep in mind that all settings (theme, plugins, WordPress itself) are stored in the database, so you may need to redo those changes.
If you know what you are doing, you may be able to transfer selected tables of the database (e.g. wp_options) without touching other tables, but this is an advanced topic and another conversation.
Another tip: for small “brochure” websites where you don’t use e-commerce or user’s registration, it’s usually ok to transfer database from staging to the live as long as client and all people who edit website content were aware of the work you are doing and were not making any changes while you were on it.
Unfortunately I don’t know about any reliable database “merge” tool which will efficiently copy incremental changes between WordPress databases, so it you happen to find one, let me know 🙂
Next Steps
I hope this post helps you to figure out the process of creating Staging site for WordPress and moving updates back and forth, please let me know if I missed anything or if you got stuck somewhere, I’ll be happy to help and update the article so other developers won’t run into the same problems.
Also, join my mailing list for more WordPress development goodies and I am looking forward to hear from you about questions you may have about WordPress development or topics you want me to cover.